Thursday, March 11, 2021

{Live beautifully...}

Hello everyone!  

I hope you are all well.

Here is my first project for March featuring the beautiful Vintage Artistry in Color Collectors Edition Vol 1. This is a photo of my daughter from a few years ago.

For this layout, I used the stunning Paper 1 from the Vintage Artistry in Color Collectors Edition Vol 1. I kept my background simple as it is already colourful and busy. 

Here is my layout.

I added a collection of rub-ons from the Vintage Artistry Blush/Sage transfers at the bottom left and top right of my layout. These designs are amazing and very easy to use, and a beautiful addition to any project. Here you can also see elements from the laser-cut sheets that is included in the collection.

I layered the matted photo on paper stacks from the Sage and Coral Ephemera stacks. These pieces were inked and distressed.  I also used a stitched frame from the Sage collection.


To create the flower cluster, I used flowers, laser cuts, die cut foliage and leaves from the Wedgewood Layered Embelishments. For the flowers I used Sugar Posies in Fluff and Tutti Fruitti, Enchanted Petals in Mint, Garden Petals in Salmon and Parchment, Mini Flower Series 01 in Ginger, Country Blooms in Ginger and Pixie Petals in Sunshine. I also used a few Dusty Attic chippies. I painted the Fluff Sugar Posies with yellow acrylic paint.  The edges of all the flowers were dry brushed with white gesso, then acrylic paint and lightly rubbed with gold rub and distress stickles.

My final touches to the layout included Wishing Bubbles in Crush, art stones and splatters with diluted white gesso.

49 and Market products used.


Thank you for visiting my blog.

Happy crafting.


Tuesday, February 16, 2021

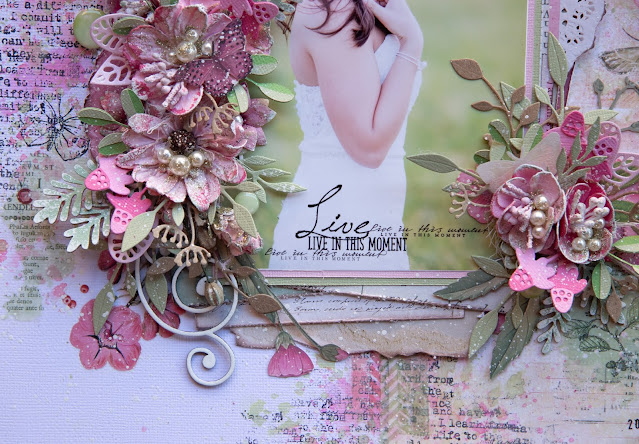
{Live in this moment...}

 Hello everyone!

Here is another layout featuring the absolutely beautiful Vintage Artistry Blush collection and I am using another wedding photo of my beautiful daughter.

For this layout I used the right side of the Poised Paper and glued the paper to white card stock and primed it with clear gesso. I then added a script stamp and butterflies from the Gratitude Today Stamp set. Where the two papers join in the center, I added Vintage Artistry Sage washi tape.  I then added colour to the background using Distress Oxides in Picked Raspberry, Worn Lipstick and Bundled Sage. 


The Blush/Sage rub-on transfers are just amazing.  Here you can see where I added them. I cut up the flower transfer and used it under my flower clusters. I also used some of the script, beads, sequins and splatter transfers.


I layered my matted photo on pieces from the Blush and Sage Ephemera stacks.  All the edges were distressed and inked. 


I have built up my flower clusters using flowers, die cut foliage and laser cuts from the two beautiful laser-cut sheets that is included in the Vintage Artistry Blush collection. For the flowers I used Sugar Posies in Fluff and Tutti Fruitti, Enchanted Petals in Mint, Maura's Vineyard in Rose, Enchanted Petals in Ballet Slipper, Mini Flowers in Scarlet and Sugar Stems in Fluff. I painted the Sugar Posies Fluff in a dark acrylic paint. These little white flowers are perfect if you need another colour, and take the paint very well. The edges of all the flowers were dry brushed with white gesso, then acrylic paint and lightly rub with gold rub and Platinum distress stickles. 

The title of my layout "Live in this moment..." is a digital stamp also designed by Katie Pertiet.  She is an amazing designer!  Here is the link to her online shop. Katie Pertiet.


I love the look of a heat embossed image with white embossing powder on vellum.  It adds such a lovely soft feel and look elegant in the flower clusters.  I used the butterfly image on the Gratitude Today stamp set also design by Katie Pertiet. 


To finish off my layout I added Wishing Bubbles, pearl beads in the center of the flowers and splatters with diluted white gesso.

49 and Market products used.


Thank you for visiting my blog.

Happy crafting!


Wednesday, February 10, 2021

{Cute as a button...}

 Hello everyone!

I am sharing my February design team project with you using some beautiful Dusty Attic chippies. I've had this large wooden button for a while and Jennifer Hedger specially made this cute title for me. This is my sweet granddaughter when she was only two weeks old.


All the chipboard pieces were first covered with white gesso.

For the ombre effect on the title I used a light and dark pink acrylic paint and white to blend the colours. The buttons were also painted with acrylic paint and tucked under the flower clusters.


The stamens were painted with acrylic paint and Glossy Accents.


I painted the Leafy stems with acrylic paint, Glossy Accents and dry brushed with white acrylic paint.


The leaves were embossed with Ranger white embossing powder.


I just love these beautiful Wordpl@y elements.  They are my favourite!


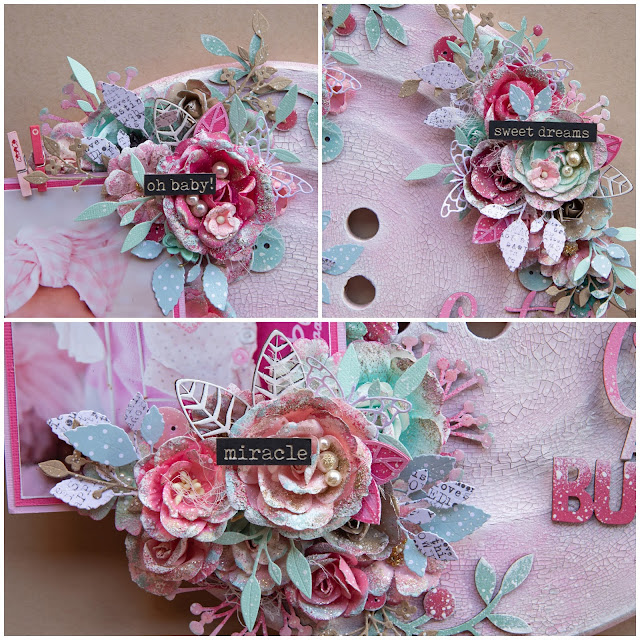
some close ups.


These are the Dusty Attic chipboard pieces that I have used.


Thank you for visiting my blog.  Please visit the Dusty Attic online store for more amazing designs.

Happy crafting!


Saturday, February 6, 2021

{O happy day...}

 Hello everyone!

The new Always and Forever collection is so romantic, and I love weddings!  There is just something about seeing the bride walk down the aisle to marry the love of her life.  This layout features my daughter and her husband.

I used The Dress and Chandelier papers as the base for my layout. Next, I cut strips from the Mr & Mrs, Bouquet Frame B-side and The Dress B-side, distressed the strips and glued them to the base paper.

From the B-side of the Mr & Mrs I used two quotes and made a shaker box with the VW Beetle. I also used the bar code from the B-side of the Dress Paper.

From the cut-out sheet I used the cute VW Beetle.

Here is my layout.

From the B-side of the Mr & Mrs I used two quotes and made a shaker box with the VW Beetle journal card. I also used the bar code from the B-side of the Dress Paper on my layout.

From the cut-out sheet I used the cute VW Beetle.

All the chippies were covered with white acrylic paint and Platinum Distress Stickles.


Some close ups.


After everything was glued down, I added pearl beads, gold glitter and splatters with diluted white gesso.

Thank you for visiting my blog.

Happy crafting!


Wednesday, January 27, 2021

{You are so beautiful...}


Hello everyone!

Here is my layout featuring the beautiful and recently released Vintage Artistry Colour Blush collection.  Every element from this collection is amazing, and I decided to use my daughter's wedding photos.  

For this layout I used the Soaring paper, the bonus sheet and strips from the B-side of the Delicate paper from the Vintage Artistry collection Sage. The Soaring paper were cut in half for the sides and glued to cardstock. The edges of the bonus sheet and Sage were distressed, inked and glued to the cardstock.  I also added border punched strips.

Here is my layout.


Next, I added rub-on transfers to the Soaring paper and bonus sheet, layered with washi tape from the Vintage Artistry Sage collection and images from the Dream stamp set, Beautiful moments and o happy day.


I layered my matted photos on pieces from the Blush and Sage Nouveau Ephemera stacks and Sage Stitch Frames.  All the edges were distressed and inked.


To create the flower cluster, I used Enchanted Petals in Mint, Flamingo and Ballet Slipper. Garden Petals in Ballet Slipper.  Sugar Stems in Fluff.  Sugar Posies in Tutti Fruitti and Fluff.  I dry brushed the edges of the flowers with white gesso, acrylic paint and gold rub. The Vintage Artistry Blush collection includes two beautiful laser-cut sheets and I added flower and foliage elements to the flower clusters as well as more rub-on transfers under the flower clusters.  A set of Dusty Attic tulip chippies was also added to the flower clusters along with foliage die cuts.


To finish off my layout I added a Dusty Attic title, pearl beads, and splatters with diluted white gesso.

49 and Market products used.


Thank you for visiting my blog.  I hope I have inspired you.

Happy crafting!


Thursday, January 21, 2021

{adore...love...cherish...}

 Hello everyone!

This is my layout inspired by the January mood board using Dusty Attic chippies. 

This layout features my beautiful little grandson James when he was only two weeks old, and now he is almost four months.  How time flies!

Here is the mood board.


 and here is my layout.


All the chipboard pieces were first covered with white gesso except for the cog frame, cogs and chains.

The mini titles and Foliage #16 were heat embossed with Ranger embossing powder in Terra Cotta and White.  


The Foliage #10 and mini Branches were painted with Americana Acrylic paint in Calypso Blue and Chalk Acrylic in Cornelia Green.


I randomly covered the cogs and chains with coarse gesso.  Next, I covered them with black gesso.   I then dabbed the pieces with a sponge brush and Americana Acrylic Paint in Traditional Burnt Umber, Georgie Clay and Calypso Blue.  I then dry brushed all the parts with white acrylic paint and Art Alchemy Wax in Rich Copper.


When everything was glued down I added Glass Glitter and splatters with diluted white gesso.

These are the Dusty Attic chipboad pieces that I have used.


Thank you for visiting my blog.  I hope you find time to play along with this beautiful mood board.

Visit the Dusty Attic online store for more amazing designs.

Happy crafting!


Related Posts Plugin for WordPress, Blogger...