Monday, December 23, 2024

{Sing your own song...}

 Hello, 49 and Market fans!  

Welcome to the blog today. 

I am sharing a layout using the beautiful Birdsong collection. My daughter-in-law and I had a photoshoot a few years ago, and this is one of my favorite photos.

For this layout, I used the Tweets of Peace paper.

Starting with the background, I used the Sizzix Bird Song stamp set. I also added rub-ons from the Blendable and Essentials Rub-on Transfer Sets.

I layered the matted photo on one of the stacked frames from the Vintage Orchard collection as well as a frame from the Color Swatch Ocher Frame Set. For the rest of the layering, I used Birdsong Ephemera Bits. The beautiful yellow lace border on the photo comes from the Color Swatch Ochre Laser Cut Elements.


To create the title I used the Sizzix Tab Stamp Alpha set and stamped the words on plain cardstock and I selected the word Sing from the Chipboard Mixed Set. 


For the two clusters on the right side of the photo I used elements from the Ephemera Bits, and Chipboard Mixed Set.


I used a variety of pretty blooms to create the flower clusters. The edges of the flowers were dry brushed with white gesso and acrylic paint. I also added flowers and foliage from the Wildflower Laser Cut set. The green leaves are from the Sizzix Forever Leaves stamp and die set, which I also used in the background. I added foliage from the Fine Stems stamp and die set.  The stems were stamped with Distress Oxide in Fired Brick.


The final touches to this layout included wishing bubbles, washi stickers, and splatters with diluted white gesso.

49 and Market products used.


Thank you for visiting the blog today.

Happy crafting!


Saturday, November 23, 2024

{This summer...}

Hello, 49 and Market fans!  

Welcome to the blog today. 

I am excited to share a layout using the gorgeous Summer Porch collection Page Kit.  This collection is stunning and will be perfect for your summer memories.  

These kits are so easy to use, and the paper, layers, and embellishments are fabulous. There's everything you need for fabulous layering, right down to the smallest detail. There is so much more than what is shown in the examples! I followed the instructions but also added my own touches. I also added a few yellow elements from the Vintage Artistry Sunburst Collection to suit my photos.


The Summer Porch collection has stunning rub-on transfer sets.  I used elements from the Essentials Rub-on Transfer Set and V/A Sunburst Rub-on Transfer Set on the background.

I glued word strips from the Ephemera Bits, chipboard words from the Summer Porch chipboard words set, and the V/A Sunburst chipboard set to my layout.


The yellow word disk is from the V/A Sunburst chipboard set.  Here you can see how I used the starfish chipboard pieces. 


I used chipboard words for the title, and the final touches to this layout included Wishing Bubbles and Baubles from the V/A Sunburst Collection and enamel dots from the Summer Porch Essentials Project Tote.


49 and Market products used.


Thank you for visiting the blog today.

Happy crafting!


Sunday, November 17, 2024

{Cherish...}

Hello, 49 and Market fans!  

Welcome to the blog today. 

This is my husband and I posing with the very handsome Antonio.

I used the beautiful Krafty Garden 12x12 Collection. I used the Engaging Florals paper and from the Vintage Orchard 12x12 collection the reverse side of the Journal Cards paper. I have torn the Engaging Florals paper into two pieces and a strip of the Journal Cards paper and glued everything together.

I then added rub-ons from the Blendable, Botanicals, and Essentials transfer sets to the background.


My next step was to build layers under my photo using Ephemera Bits, Laser Cut Elements, and a frame from the Vintage Orchard Stacked Frames Set and Color Swatch Ochre Frame. I also used elements from the Color Swatch Ochre and Willow Ephemera Stackers. All the edges were inked with brown ink.


I glued word strips and phrases from the Laser Cut Elements, Ephemera Bits, Chipboard Words, and Chipboard Set on the photo and the cluster on the right.


For the clusters, I used laser-cut and wildflower elements. I glued pieces of the paddock fence on either side of the photo. I glued word strips from the chipboard set to the photo.


49 and Market products used.


Thank you for visiting the blog today.

Happy crafting!


Saturday, October 12, 2024

{Believe...}

Hello, 49 and Market fans!  

Welcome to the blog. 

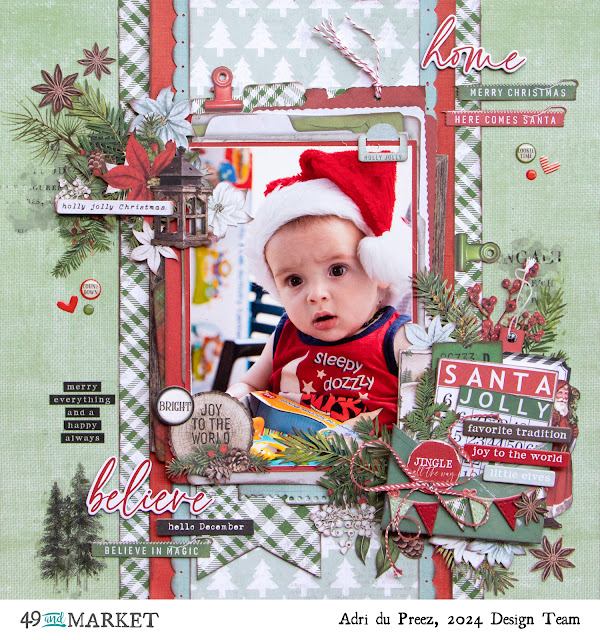
I am sharing another layout with the gorgeous Evergreen Season collection. 

For this layout, I used the reverse side of the Festive Tradition, Ceremonious Poinsettias, and Solids Paper 4 and 5.  I chose the Solids Paper 5 as the background paper. From the Festive Traditions paper, I cut a strip of 4,5 inches, and from the Solids Paper 4 and the reverse side of the Ceremonious Poinsettias 1,5 inches strips for layering under the Festive Traditions Paper. This was then glued to the Solids Paper 5.

The matted photo was layered on a Vintage Orchard Stacked frame. These frames create a stunning layered look. I also added a chipboard frame.  The red frame with the red and white twine is from the Summer Porch By Land Laser cuts.


To create this cluster I filled a green pocket from the Vintage Orchard Ephemera Bits with Evergreen laser-cut elements.  The two Christmas Bingo cards are from the Christmas Spectacular Ephemera Bits. The pocket was then decorated with chipboard words.


"Believe" is one of the Chipboard Words I used for the title. I also used Essential 
Rub-ons here.


Here is another cluster using Essential and Botanical rub-ons, laser-cut elements, and words.


Some more sentiments and a chipboard word, as well as wishing bubbles.

49 and Market products used.


Thank you for visiting the blog today.

Happy crafting!


Sunday, September 22, 2024

{Sweet moments...}

Hello, 49 and Market fans!  

Welcome to the blog today. 

I am sharing a layout using the beautiful Birdsong collection.  It is such a pretty collection with all the amazing images. This is a photo of my daughter and her family.

For this layout, I used the Songs of Hope paper. 


I layered the matted photo on Ephemera Bits and Ephemera pieces I had left from the Birdsong page kit. I inked all the edges.


I used a variety of pretty blooms, and laser cuts to create the flower clusters. The edges of the flowers were dry brushed with white gesso and acrylic paint. I also added flowers and foliage from the Wildflower Laser Cuts set and Laser Cut Elements.  The craft leaves are from the Sizzix Forever Leaves stamp and die set.  


Sunday, September 8, 2024

{Hello Fall...}

Hello, 49 and Market fans!  

Welcome to the blog today. 

I am sharing a layout using the beautiful Vintage Orchard collection.  I love the warm hues of autumn in this collection.

For this layout, I used the Turning Point paper.

I glued my matted photo to one of the stacked frames.  These frames create a stunning layered look. I also added ephemera bits and a frame from the Color Swatch frame set.  


I used words from the ARToptions Spice and ARToptions Plum Grove word sets for the title and the phrases are from the chipboard set.  The butterfly is from the Color Swatch Peach acetate leaves. I used rub-ons from the Essentials and Botanical Rub-on Transfer Sets.


I used ephemera bits to create this cluster.


I used Laser Cut Elements, Wildflower Laser Cuts, and rub-ons from the Essentials and Botanical Rub-on Transfer Sets for this cluster. A few acetate leaves were also added.


This sentiment is from the Nature Study 12x12 Sentiments Rub-on Transfer Sheet.


49 and Market products used.


Thank you for visiting the blog today.

Happy crafting!


Friday, August 23, 2024

{Merry Christmas...}

Hello, 49 and Market fans!  

Welcome to the blog today. 

I am on the blog today featuring a layout created with the gorgeous Evergreen Season collection.

For this layout, I used the Cheerful Christmas Star, Joyful Timber, and Solids Paper 1.  I selected the Solids Paper 1 as my base.  From the Cheerful Christmas Star paper, I cut a strip of 4.5 inches and from the Solids Paper 4, I punched two strips with a lace punch and glued them to the Cheerful Christmas Star paper.  This was then glued to the Solids Paper 1.

Using different sizes of circle punches, I punched out some wood slices from the Joyful Timber paper and randomly glued them to the background.

Next step, I added rub-ons from the Essentials and Botanical Rub-on Transfer Sets to the background.


 The layering was done with some of the images on the backside of the laser-cut packaging. Laser-cut elements were also added.


To create this cluster, I used l laser cut images and word phrases as well as punched-out wood slices from the Joyful Timber paper.


I used a variety of pretty blooms, and laser cuts to create the flower cluster. The edges of the flowers were dry brushed with white gesso and acrylic paint. I also added flowers and foliage from the Mini Laser Cut Elements, a few wood slices, as well as rub-ons from the Botanical and Essentials Rub-on Transfer sets. 


For the title, I used Chipboard Words. 


The final touches to this layout included Wishing Bubble Epoxy Stickers, and splatters with diluted white gesso. 

49 and Market products used.


Thank you for visiting the blog today.

Happy crafting!


Wednesday, August 7, 2024

{Charming...}

 Hello, 49 and Market fans!  

Welcome to the blog today. 

I am so excited to share my new layout using the stunning new Rust and Revs collection designed by Dennis Bruton. 

We visited Namibia in 2017. Solitaire is one of Namibia's most enigmatic destinations, a small desert town with only a diner, church, petrol station, and small shop. The first thing to catch a visitor's attention when arriving at Solitaire is the treasure trove of rusted vintage car wrecks.  This collection is perfect for my photos.  

For this layout, I used the Journey and Expedition papers, and they are perfect for creating a double layout. The corner images on these papers are stunning and so realistic. I used pieces from the Thrill and Freedom paper for layering.  With a corner punch, I rounded the corners and then inked the edges. 


Rub-ons are used around the page to add extra details.  For the title I used the die-cut Charming included in the Die-Cut Elements set and raised it with foam tape.  Words were matted on cardstock, raised with foam tape, and glued randomly to the photos. Here you can also see some elements from the Rub-on Transfer Set. 


To create the frame cluster, I glued the frame to a piece of Thrill paper with foam strips for dimension.  I filled the frame with Laser Cut and Die-Cut elements.  How amazing are these trucks, they look like replicas of the trucks in my photos. The trucks were also lifted with foam squares.


These beautiful cactuses are also from the Laser Cut Element Set.


Here is another cluster using cactuses and tires from the Laser Cut Element Set.  Stunning fussy cut images are on the back of the Laser Cut Elements cover.  There are even gears that you can punch out with a circle punch. How cool is this?


49 and Market products used.


Thank you for visiting the blog today.
Happy crafting!


Related Posts Plugin for WordPress, Blogger...